What is Pivio ?
Pivio is description in your source code with all the metadata of your service describing itself. This can be as simple as the name, owner and vcs information as well as useful information about runtime environment, used licenses and service dependencies.
Pivio is a service registry for humans.
Why Pivio ?
If you have many services composing your platform it is easy to get lost. This is especially true for the a microservice environment. While you might want a great independence of the teams (which do have everything they need under their control) reusing services sometimes is advisable. This might be services like authentication or a central user service.
A growing number of services means also a challenge not only for developers. Which service runs where? What does it do? Who is responsible for that?
Quickstart
Pivio has a demo setup to get you started quickly.
Requirements:
You need Java 8 and Docker installed.
Run the following command in your shell:
curl https://raw.githubusercontent.com/pivio/pivio-boot/master/pivio.sh | /bin/shThis will fetch all Sources, builds it, starts the server and imports some demo data.
After that you can open your browser on port 8080 http://localhost:8080/ to see Pivio in Action.
To stop the environment use docker-compose down.
Key concepts
Pivio is in its core a very simple idea. It’s Json files in a database. The real value is in the data the developers provide. Pivio just collects it in a central place and makes it searchable.
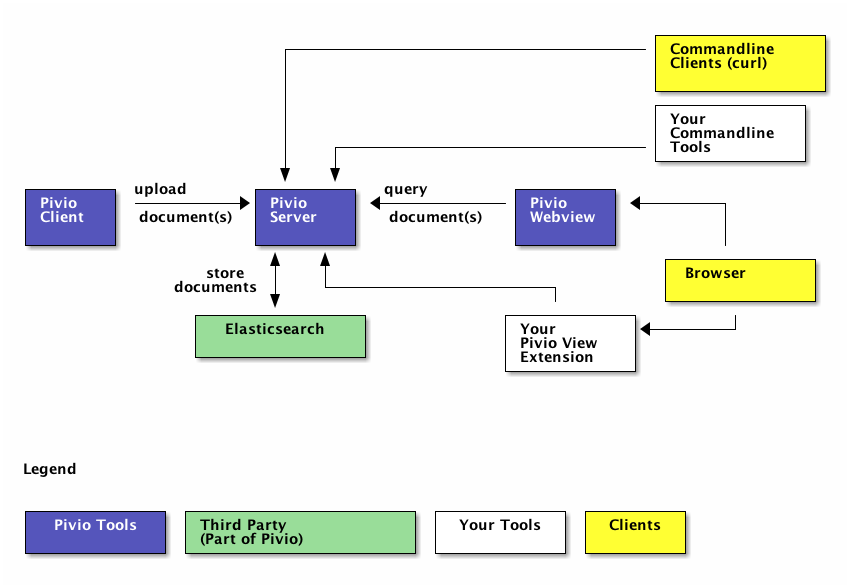
Pivio will only consists of three main parts.
-
The upload client
-
The simple, domain specific REST API to elasticsearch
-
A Webview
This is what you can start with. The real power comes from extension and from tools that query the database which are not part of core Pivio.
The Pivio WebView provides a simple way to browse the in described data format. It also offers a simple QueryEditor and a feed for what changed in the platform.
With the client you can upload any data, not just the one described in the data format section. This gives you the power to upload and search any data you think might be useful for your use case. The only downside is that it will not be displayed in the WebView. To see it nevertheless the WebView can be extended to include your own standalone view of your custom data. See Extending Pivio.
Data format
The data format is somewhat generic and you can use any attributes you need for your use case. However, we tuned the server backed elasticsearch a bit to support the structure we think is useful.
The examples are all in yaml format. This is just a convenience since we think it is easier to read and write than json. A suitable client on the other hand must to speak json to the server, so he needs to convert it.
Location
You have two choices to specify your metadata of your code and services.
-
In one single
pivio.yamlfile in the vcs root of your project -
In a directory called
pivioin the root of the source code
The content is structured in both cases the same. In the single file case you need to have section as keys like general, network and software_dependencies. In the latter case you can split the content in multiple files in the subdirectory pivio. If you have both pivio.yaml and pivio directory the client should exit with an error message.
So what’s the different use cases for both styles? In your own source code you will usually use the directory based approach, since the config file can be very long, especially when you leave all the (useful) comments in. So we split it into much smaller section, so it all should fit on one page in your editor.
So why use the single file approach at all? For modeling certain aspect of the services you need, like 3rd party services you access, it is very tiring to split the little information you have/need into multiple files. This is usually the case for a single file configuration. Since it is easy to start with a single file most projects will start with that. After some growth, simply move the pivio.yaml in the pivio sub directory and begin adding data in other files. It is recommended to split them by sections.
|
Important
|
The current client implementation only supports the single file approach at the moment. |
So a config directory version would look like this:
+- ...
+- src/
+- pivio/
|   +- pivio.yaml
|   +- context.yaml
|   +- runtime.yaml
+- readme.md
+- ...
and a single file version more like this:
+- ...
+- src/
+- pivio.yaml
+- readme.md
+- ...
What’s inside
Every section, except some attributed of the general section, is optional. The idea at the moment is that every section will be represented correspondingly in the UI somehow.
Convention: All keys are lower case and words are connected by '_'. No camelcase.
General
Pivio needs certain mandatory fields:
-
id Unique id in pivio. You can ask the pivio service for a unique id.
-
name The name of the artefact. This is intended for humans.
-
short_name A very brief name for the service.
-
type The type of this artefact. Values could be
service,libraryormobile_app. -
owner Which team is responsible for this artefact.
-
description What does this service do?
contact
Who should be contacted if one has a question.
vcsroot
Where can I find the source code? A client who parses this file might choose to generate it from the code which it has at hand (if it is under source control).
tags
Add tags.
lifecycle
In which lifecycle is this component? Only in development, in production or out of service.
links
All sort of links which might be interesting. Candidates are
-
homepage
-
buildchain
-
api docs
Example:
id: next-generation-print-2342-2413-9189-1990
name: Next Generation Print Service
short_name: NGPS
type: service
owner: Team Goldfinger
description: Prints all kinds of things. Now with 3D printing support.
vcsroot: git://git.vcs.local/UBP
contact: Auric Goldfinger
lifecycle: production
tags:
 - Old
 - Demo
links:
  homepage: http://wiki.local/ubp
  buildchain: http://ci.local/ubp
  api_docs: http://docs.local/ubp-api
Service
provides
What and where does this artefact provides services?
description Should be a human readable description.
service_name is the unique identification of the particular interface. port, protocol and transport_protocol are self describing.
depends_on
internal
To which other service_name (from provides) services does this service talk? Option: service_name
If you don’t know the service name, you can specify the short_name of this service with appended '\_' and the port number (e.g. NGPS_8791). This has the disadvantage if the port number changes your resulting data might be incorrect (Option: short_name_port)
why defines why this connection is needed.
external
To which external target needs this artefact to talk to? This is meant to show if this service talks to another one outside of your system, like a public API of another service provider 'in the cloud'.
What is the transport_protocol and why is it needed? If it access the external resource via another service, it can be defined.
Example:
service:
 provides:
    - description: REST API
      service_name: uber-bill-print-service
      protocol: https
      port: 8443
      transport_protocol: tcp
     public_dns:
       - api.demo-company.com
       - soap.demo-company.io
    - description: SOAP API (legacy)
      service_name: print-service
      protocol: https
      port: 80
      transport_protocol: tcp

  depends_on:
    internal:
      - service_name: print-service
            why: need to print
      - service_name: gateway-service
      - short_name: NGPS
            port: 8719
    external:
      - target: https://api.superdealz.me:443
        transport_protocol: tcp
        via: proxy-service
        why: Need to sync data with it.
      - target: mqtt://192.xxx.xxx.xxx:5028
        transport_protocol: tcp
        why: Get the latest Dealz.
Service Context
If the service does belong to a bounded context it can be specified in: belongs_to_bounded_context. General rule is that every service belongs to a bounded context.
Which visibility does this service have?
-
private: intended usage is only by the owner -
public: exposes an api for other owners.
Components that are under development, experimental, not supported, being replaced or to change without warning should be private.
context:
  belongs_to_bounded_context: Delivery
  visibility: private
Runtime
Which requirements does this service have on the runtime? This is used for sizing the machine, VM or container. Using T-Shirt sizes instead of real values makes it easier to adopt the sizing for different environments. In a test environment the machines might be smaller.
On what kind of host_type is this service running? Values could be:
-
Metal
-
VM
-
Docker
In which network_zone is this service located? You choose what the values should be, e.g. DMZ, BACKEND, CORE, DATABASE.
You can define the different stages where you deploy your service in the attribute environment. This can be used to provision your
cluster. This way you can define if a service should roll straight to production or not.
runtime:
  cpu: L
  ram: S
  disk: XL
  host_type: VM
  network_zone: BACKEND
  environment:
    - development
    - test
    - production
Software Dependencies
This section might be generated by a client automatically usually by reading the generated licenses information from the corresponding build tool.
If however you need to specify the software dependencies by hand, this is the place to be. Specify name, the version, which license is used and the url of the license.
software_dependencies:
  - name: PHP
    version: 3.0.1
    licenses:
      - name: PHP License
        url: http://php.net/license/3_01.txt
  - name: GNU C
    version: 4.9.2
    licenses:
      - name: GPL
        url: https://gcc.gnu.org/onlinedocs/libstdc++/manual/license.html
  - name: Strange Framework
    version: 1.0
    licenses:
      - name: GPL
        url: https://gcc.gnu.org/onlinedocs/libstdc++/manual/license.html
Custom extensions
If you need to have your own keys in this configuration you can simply add your own key word/yaml file.
Example:
host_group: XYZ
os: debian
Talking JSON?
Since the server works on json, you could use it to feed data into it. Here is the example-singlefile/pivio.yaml example on how it would look like in json:
You can use the -dry switch on the official client to see the transformed json from a standard yaml file.
{
  "owner": "Team Goldfinger",
  "vcsroot": "git://git.vcs.local/UBP",
  "description": "Prints all kinds of things. Now with 3D printing support.",
  "runtime": {
    "disk": "XL",
    "network_zone": "BACKEND",
    "cpu": "L",
    "host_type": "VM",
    "ram": "S"
  },
  "type": "service",
  "tags": [
    "Architecture"
  ],
  "service": {
    "depends_on": {
      "internal": [
        "print-service",
        "gateway-service"
      ],
      "external": [
        {
          "why": "Need to sync data with it.",
          "transport_protocol": "tcp",
          "target": "https://api.superdealz.me:443",
          "via": "proxy-service"
        },
        {
          "why": "Get the latest Dealz.",
          "transport_protocol": "tcp",
          "target": "mqtt://192.xxx.xxx.xxx:5028"
        }
      ]
    },
    "provides": [
      {
        "protocol": "https",
        "port": "8443",
        "service_name": "uber-bill-print-service",
        "description": "REST API",
        "public_dns": [
          "api.demo-company.com"
        ],
        "transport_protocol": "tcp"
      },
      {
        "protocol": "http",
        "port": "80",
        "service_name": "print-service",
        "description": "SOAP API (legacy)",
        "public_dns": [
          "soap.demo-company.io"
        ],
        "transport_protocol": "tcp"
      }
    ]
  },
  "contact": "Auric Goldfinger",
  "name": "Next Generation Print Service",
  "context": {
    "visibility": "private",
    "belongs_to_bounded_context": "Delivery"
  },
  "short_name": "NGPS",
  "links": {
    "api_docs": "http://docs.local/ubp-api",
    "buildchain": "http://ci.local/ubp",
    "homepage": "http://wiki.local/ubp"
  },
  "id": "next-generation-print-2342-2413-9189-1990"
}
Software
To get up and running you need to have the backend server and the client running. As explained earlier, you strictly do not need the client, you could just send json or write your own parser for the pivio.yaml file.
Building the software
The code is available from the Github repository at: https://github.com/pivio/
All code is written in Java 8 and needs Gradle for building.
Change into each directory and issue gradle build to compile, test and package. A gradlew wrapper is provided
if you do not have gradle installed.
The ready to use jar file will be located in build/libs.
Client
The client gathers the information about the software. You would run it like this
java -jar build/libs/pivio.jar
This will
-
look for a
pivio.yamlin the current directory -
read a generated dependency file from maven, sbt or gradle. You need to generate this information beforehand.
-
read the vcs root information. At the moment git and svn are supported.
At the end everything is converted to json and sent to the server. If none is specified http://localhost:9123 is assumed.
Command Line Options
usage: pivio
 -config <arg>               Defines the config for all parameters. This
                             is a properties file with some the switches
                             listed here. Default location is
                             /etc/pivio-client.properties.
 -defaultconfigname <arg>    Defines the name of your yaml metadata. The
                             suffix '.yaml' will be always appended.
                             Defaults to 'pivio'.
 -dry                        Do a dry run, do not submit anything but
                             output it to stdout.
 -file <arg>                 Full path to a file containing the data in
                             yaml format. Does not have to be named
                             pivio.yaml. This overwrites the -source
                             switch and only information in this file will
                             be collected.
 -generatejsonschema         Outputs the json schema for validation to the
                             current processed yaml file.
 -gitremote <arg>            Uses the given argument as origin for Git VCS
                             remote detection (default: origin). This is
                             useful if you have multiple remotes
                             configured and/or differently named.
 -help                       This Help.
 -manualdependencies <arg>   Defines the file which holds manual defined
                             dependencies. Defaults to:
                             pivio/dependencies.yaml.
 -out <arg>                  Output the generated json to this file.
 -outattributes <arg>        Only output these top level attributes to the
                             outfile, e.g. name,id,runtime.
 -piviofilenotfoundexit0     Fail with Exit(0) when a pivio document was
                             not found in the source directory. Default is
                             1 in such as case.
 -serviceurl <arg>           The url of the pivio service. If this switch
                             is not supplied, no upload will happen.
 -source <arg>               The directory containing the pivio.yaml file.
                             Should be the root directory of the project.
 -sourcecode <arg>           Defines the directory (or comma-separated
                             directories) your source code with the build
                             file is located in. If it is relative path,
                             it is relative to the pivio.yaml file. This
                             switch can also be defined with the
                             'PIVIO_SOURCECODE' environment variable.
 -uploadfailexit1            Fail with Exit(1) when document can not be
                             uploaded. Default is 0 in such a case.
 -verbose                    Prints more information.
 -version                    Shows the version of the client and end the
                             client.
 -yamldir <arg>              All *.yaml files in this directory will be
                             read and each file is treated as self
                             contained definition of an artefact.

Usage: java -jar ./pivio.jar -source /home/ci/source/customerservice
You can define certain defaults in a properties file which will be used if it exists. The default location for this is /etc/pivio.properties (can be configured via -config switch).
You can configure the following values:
-
source
-
gitremote
-
serviceurl
-
file
-
defaultfile
-
yamldir
-
manualdependencies
The format is key:value as in Java properties files.
Exit codes
If a Yaml file is not a valid yaml file the client will exit with code 1 unless the switch piviofilenotfoundexit0
Dependencies & License information
Pivio can leverage exiting tools to gather information about software dependencies and their license types. At the moment Pivio supports three build tools and their tooling to get this kind of information.
Maven
If your code uses Maven you need to run the following command:
mvn org.codehaus.mojo:license-maven-plugin:download-licenses.
Gradle
To get started with gradle you need to include a plugin in your configuration.
buildscript {
    dependencies {
         classpath 'nl.javadude.gradle.plugins:license-gradle-plugin:0.11.0'
    }
}
apply plugin: 'license'

// most projects doesn't contain a LICENSE file so ignore this step
licenseMain.enabled = false
licenseTest.enabled = false

downloadLicenses {
    includeProjectDependencies = true
    // if you have dependencies but result is empty then use compile instead of runtime dependencies
    // dependencyConfiguration = 'compile'

    // recommend license mapping to avoid duplications
    ext.apacheTwo = license('Apache License, Version 2.0', 'http://opensource.org/licenses/Apache-2.0')
    ext.mit = license('MIT License', 'http://www.opensource.org/licenses/mit-license.php')

    aliases = [
       (apacheTwo) : ['The Apache Software License, Version 2.0', 'Apache 2', 'Apache License Version 2.0', 'Apache License, Version 2.0', 'Apache License 2.0', license('Apache License', 'http://www.apache.org/licenses/LICENSE-2.0')],
       (mit) : ['The MIT License (MIT)', license('New BSD License', 'http://www.opensource.org/licenses/bsd-license.php')]
    ]
}
To enable Pivio to use this you need to run: gradle downloadLicenses.
SBT
If you use SBT you need to add the following part to one of your build files (e.g. license.sbt).
addSbtPlugin("com.typesafe.sbt" % "sbt-license-report" % "1.0.0")Then run sbt dumpLicenseReport.
Manual License & dependencies information
You can specify the dependency information in the pivio.yaml file. See Dependencies for the format.
npm
You will need the license-checker to generate the license information into a file named dependencies.json, which must then reside in the same folder as package.json:
npm install license-checker
# on same folder as package.json:
./node_modules/license-checker/bin/license-checker --json > dependencies.json
Server
The server is the backend and uses elasticsearch to store and query the information. Two rest end-points will be exposed.
-
/document -
/changeset
TODO: API
Since the server is using elasticsearch you need to have a running elasticsearch 1.7.x.
Download it from https://download.elastic.co/elasticsearch/elasticsearch/elasticsearch-1.7.5.zip .
Unzip it and start it with bin/elasticsearch.
This is how you start the pivio-server:
java -jar build/libs/pivio-server-1.0.0.jarBy default it listens on port 9123. The pivio client connects to this server and this port.
Webview
To start the web view use:
java -jar build/libs/view.jarAfter that the web view is available on port 8080, e.g. http://localhost:8080 .
The WebView is looking for a configuration for the server in the pivio-conf/server_config.yaml file.
The default is:
api: http://localhost:9123/
js_api: http://localhost:9123/
mainurl: http://localhost:8080/
pages:
  - description: Overview
    url: /app/overview
    id: tabOverview
  - description: Query
    url: /app/query
    id: tabQuery
  - description: Feed
    url: /app/feed
    id: tabFeed
This describes where all the relevant parts of the pivio components are and how the menu structure should look like.
-
api: The location of the Server Rest API -
js_api: The location of the Rest API for Javascript, this can be different depending on Virtual Machine / Docker mix -
mainurl: The location of the main WebView -
pages: Describes each menu entry with-
description: Text in the menu -
url: The URL of this entry (can be a different machine, like a custom extension) -
id: Id to use for reference
-
Running in Docker
You can mount the pivio-conf volume with your own configuration file.
Extending Pivio
Data
As mentioned in the Dataformat section you can include your own data structures as you see a need for it.
View
To display them you can roll your own service and just use the API to query the data. If you want to use the WebView client provided by Pivio you add links to the menu bar of the view to link to your extension. This way there is no need to change the core WebView, the connection is just done with hyper links. Your own extension can get the information like API endpoints and existing menu structure form the WebView.
The WebView exposes the configuration of the current setup under the http://<server>:<port>/config. You
can query it to get all information needed. An example output would be:
{
  "pages": [
    {
      "description": "Overview",
      "id": "tabOverview",
      "url": "http://localhost:8080//app/overview"
    },
    {
      "description": "Query",
      "id": "tabQuery",
      "url": "http://localhost:8080//app/query"
    },
    {
      "description": "Feed",
      "id": "tabFeed",
      "url": "http://localhost:8080//app/feed"
    }
  ],
  "apiAddress": "http://localhost:9123/",
  "mainUrl": "http://localhost:8080/",
  "jsApiAddress": "http://localhost:9123/"
}
These are all the information you need to hook into the menu system of the main WebView and gives you all relevant information about query capabilities. See WebView documentation more information.
Based on these information you can build your own menu system, query and show your content. The main WebView uses semantic-ui as style.
An example javascript snippet could look like this:
...
$.ajax({
    url: pivioUrl + '/config',
    dataType: 'json',
    cache: false,
    success: function configure(data) {
        pivioConfig = data;

        var source = $("#menu_template").html();
        var template = Handlebars.compile(source);
        $('#main_menu').append(template(pivioConfig.pages));
        $("#<<<YOUR COMPONENT ID>>>").addClass("active");
A matching handlebars template would look like this:
...
<script id="menu_template" type="text/x-handlebars-template">
    <div class="item">
        <div class="ui animated  button" tabindex="0">
            <div class="visible content">pivio</div>
            <div class="hidden content">
                <i class="heart icon"></i>
            </div>
        </div>
    </div>

    {{#each this}}
    <a class="blue item " id="{{this.id}}" href="{{this.url}}">{{this.description}}</a>
    {{/each}}
</script>


<div id="main_menu" class="ui pointing menu">
</div>
...
Best Practices
Working example
Cook Book